
Adding & importing members
There are two ways to put members on your roster yourself: create them one at a time from the Members page, or bring in a whole spreadsheet with the CSV importer. Both need at least one membership tier to exist first — the New member button and the ⋯ menu’s Import item stay disabled until one does.
Add a single member
Section titled “Add a single member”-
Click Members in the sidebar, then New member.
-
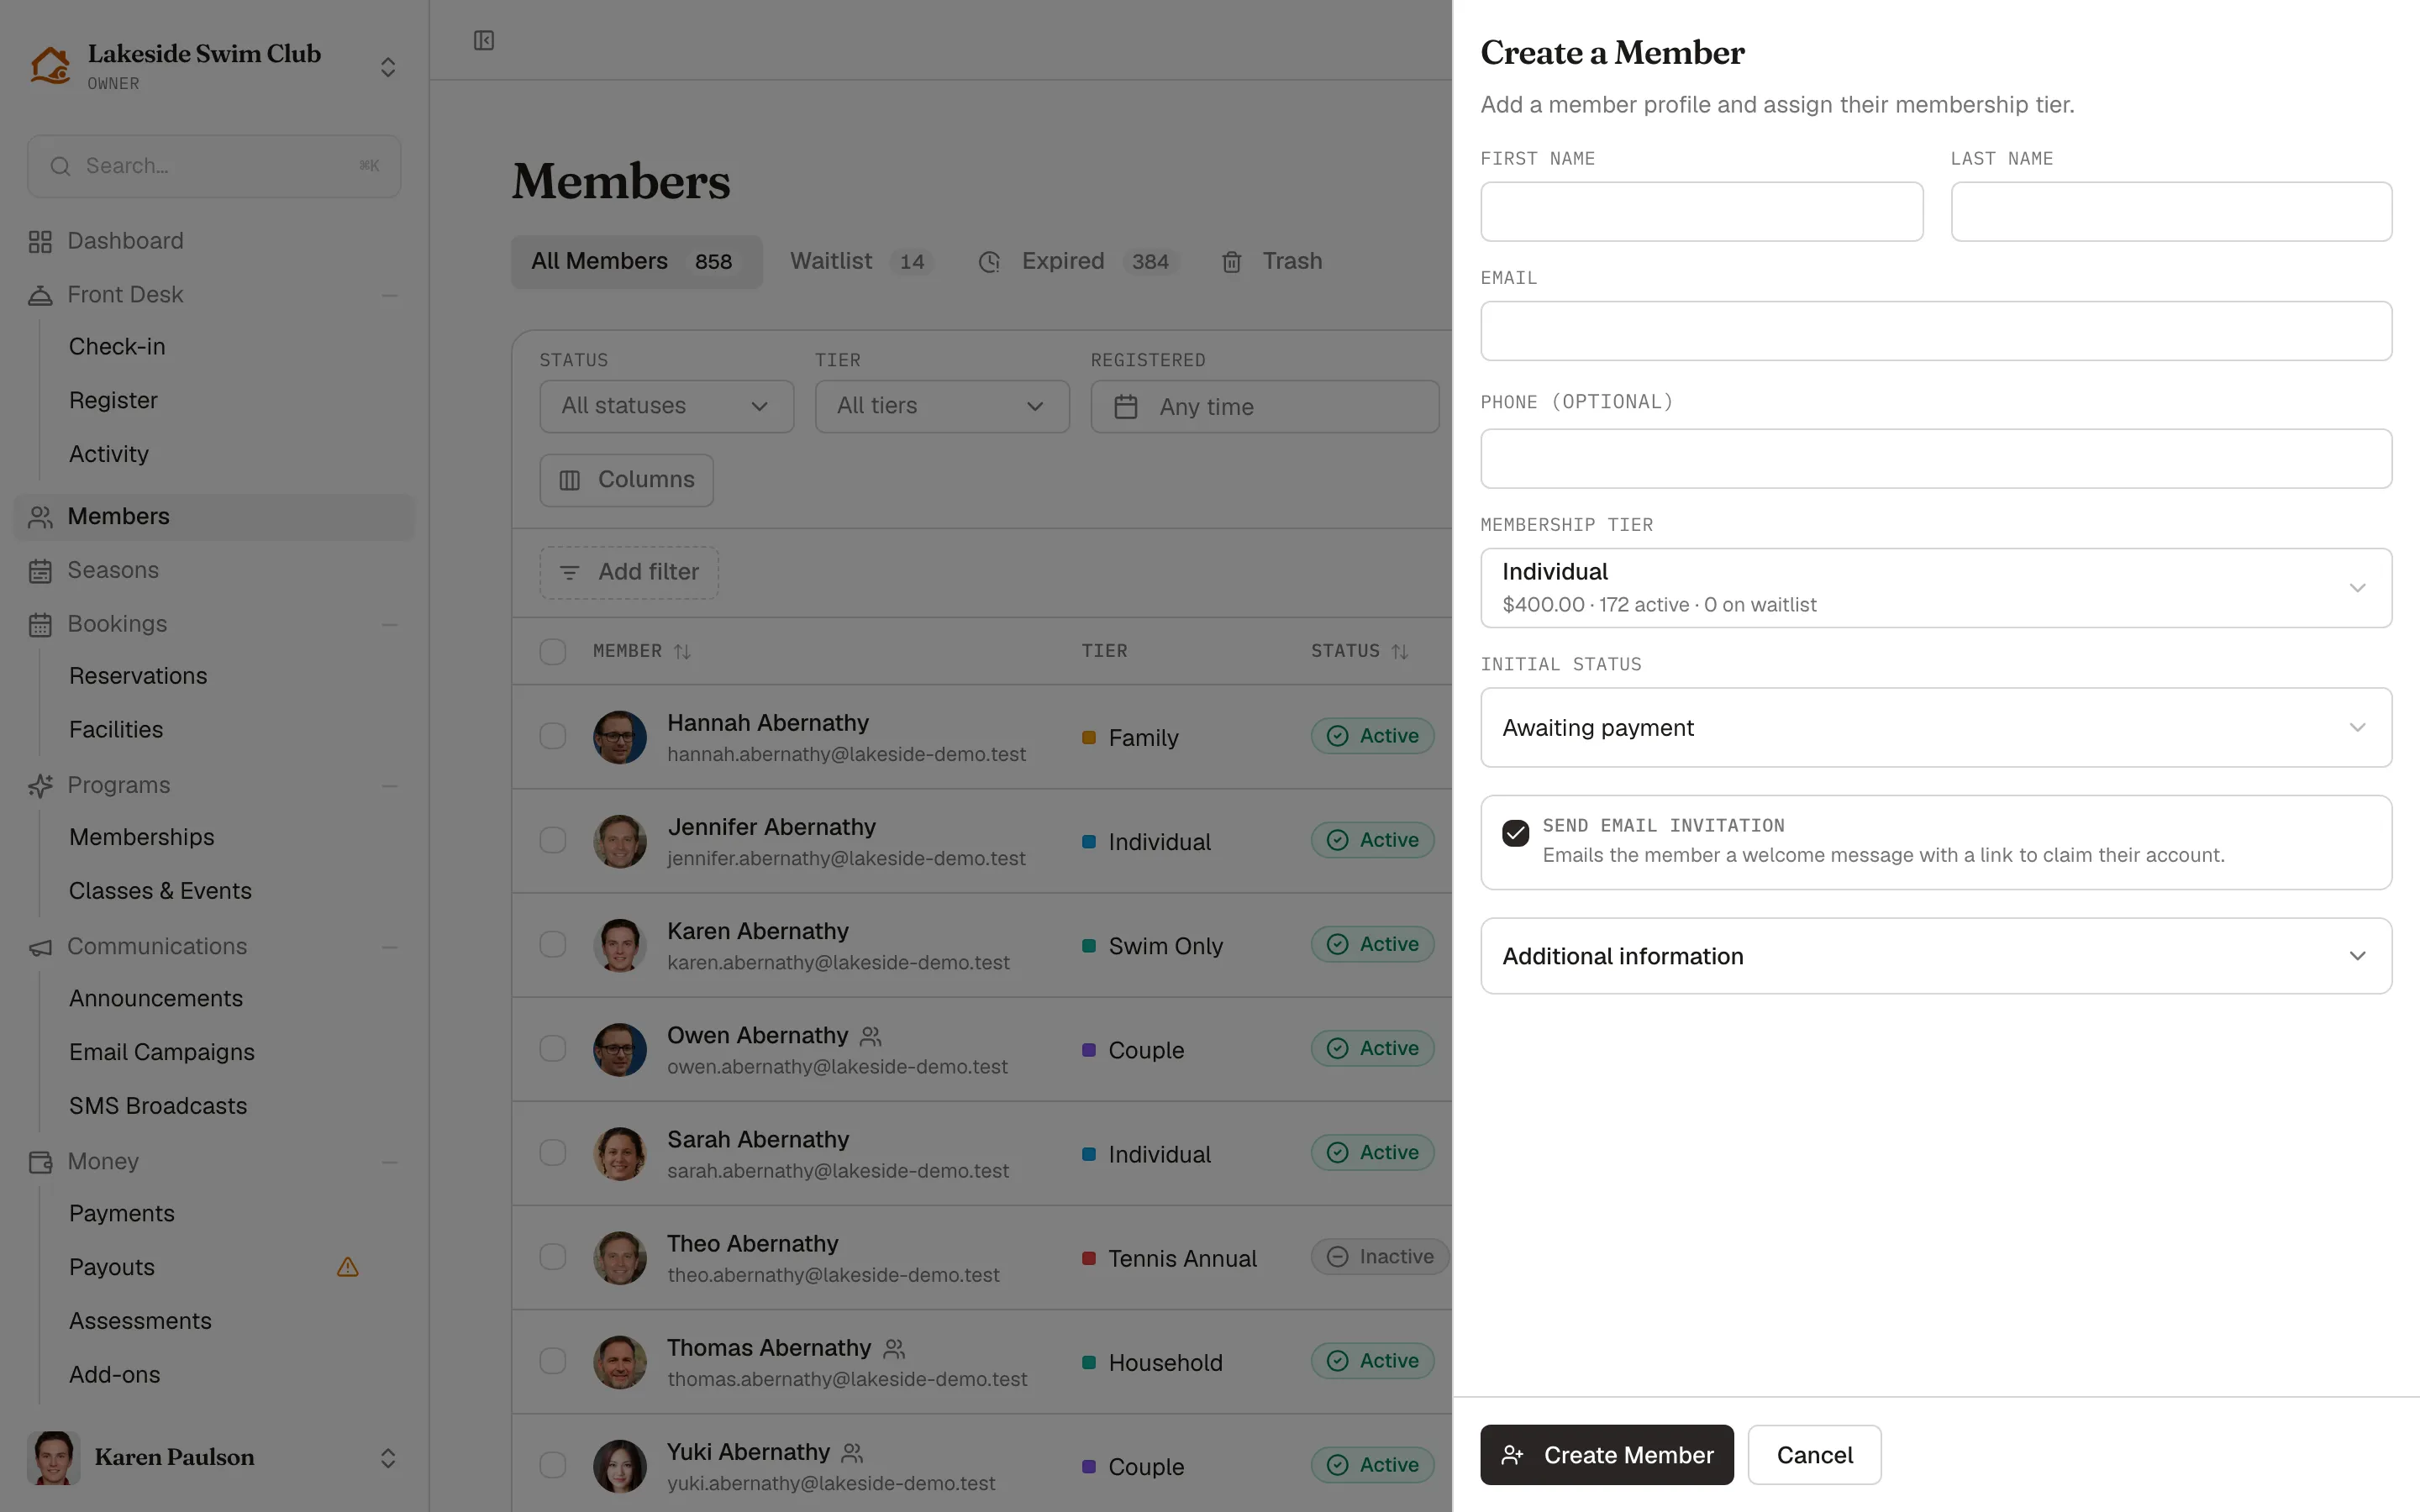
In the Create a Member drawer, fill in Name, Email, and optionally Phone.
-
Pick a Membership tier — each option shows its price, filled spots, and waitlist count.
-
Pick an Initial status: Active, Awaiting payment, or Waitlisted. Free tiers with auto-activate default to active; everything else defaults to awaiting payment.
-
Leave Send email invitation checked to email the member a welcome message with a link to claim their account, or uncheck it to add them silently.
-
If you have member custom fields, an optional Additional information section holds them — staff can save an incomplete record.
-
Click Create Member.
If the chosen tier is full, an alert offers Switch to waitlist — active and awaiting-payment members can’t be added to a full tier.
Import members from a spreadsheet
Section titled “Import members from a spreadsheet”-
Click Members, then open the header’s ⋯ menu and click Import.
-
Choose the import mode (shown when you have importable custom fields): Add new members or Update fields.
-
Click Choose a file and pick your spreadsheet — CSV (
.csv,.txt) or Excel (.xlsx), up to 5,000 rows per import. Split a larger roster into several files and run them one after another.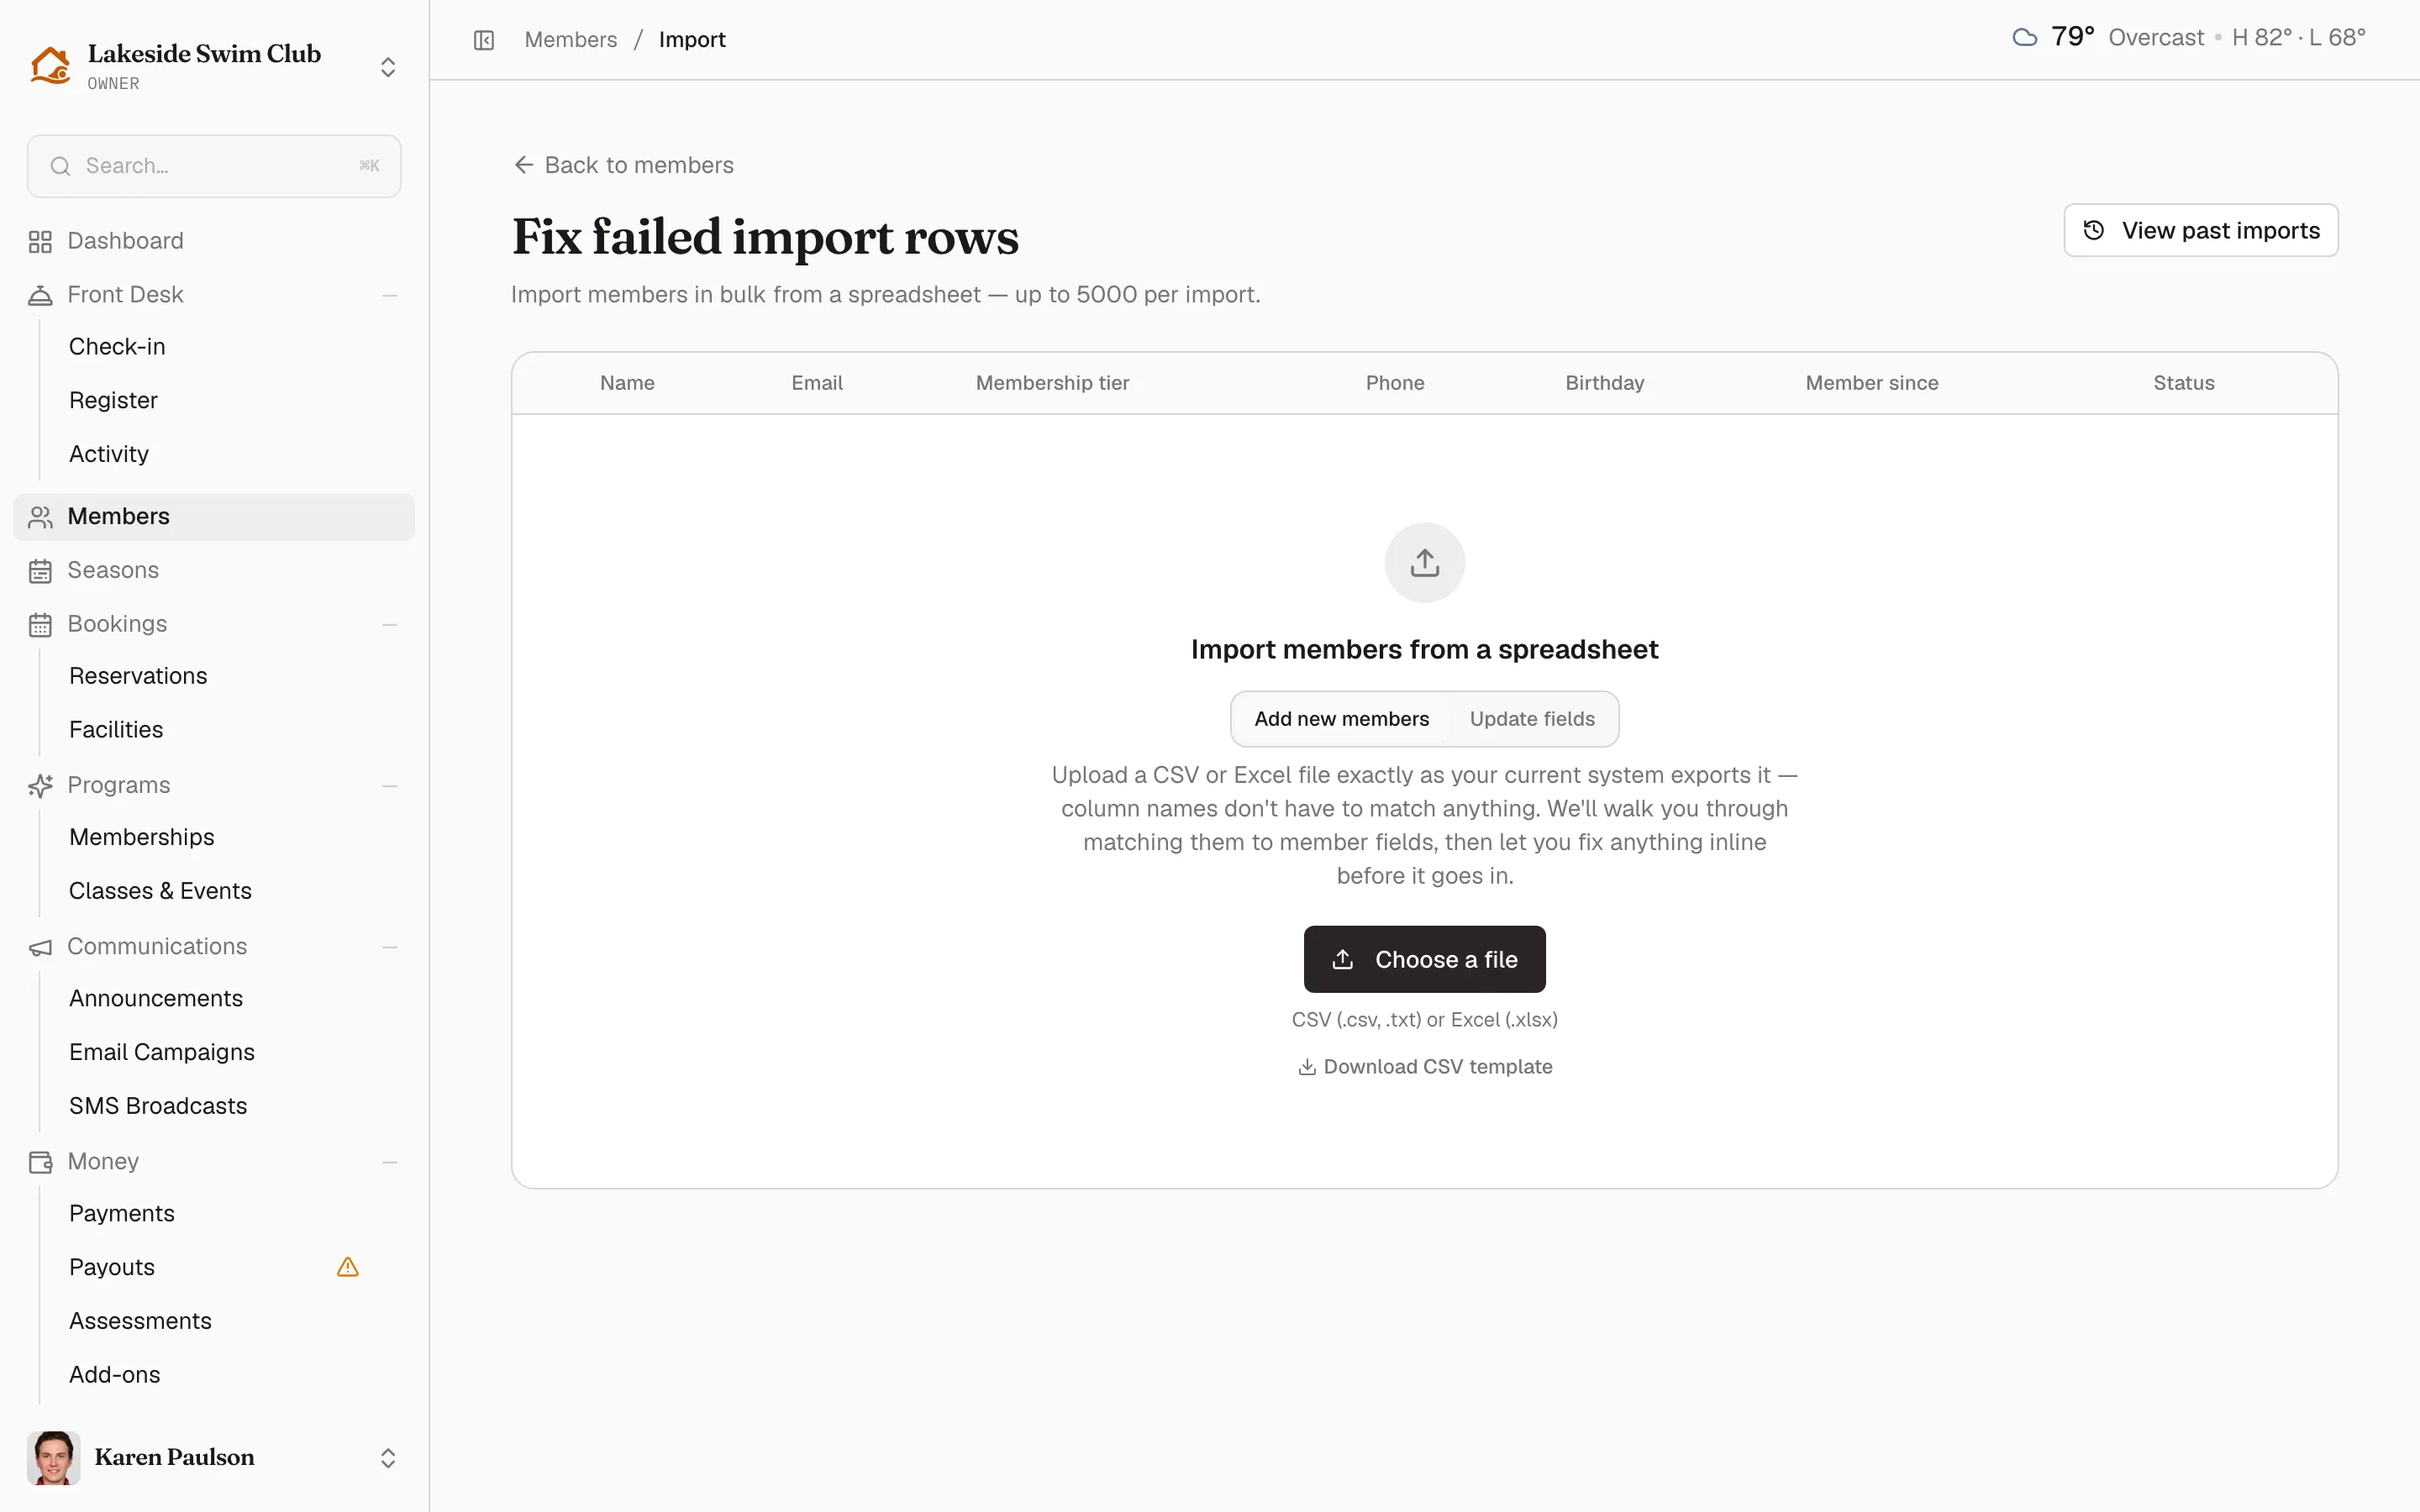
-
Match your columns. Upload the file exactly as your current system exports it — column names don’t have to match anything. Memberley guesses where it can and asks you to confirm the rest.
The fields you can bring in are Name (or first and last name), Email, Membership tier, Phone, Birthday, Member since, Status, Member of, and Relationship, plus any importable custom fields. Name and email are the only ones a new member can’t be created without; everything else is optional and fixable inline afterwards. Member of and Relationship are for family members, who don’t need an email.
A Download CSV template link provides a starting file with the standard headers — name, email, membership_tier, status, phone, birthday, member_since, member_of, relationship — and three example rows: two members and one family member.
Member since is the member’s tenure anchor — the date assessments count membership years from. Bring it in for a legacy roster: without it, every imported member reads as being in their first membership year, because the import is the only activation Memberley has on record.
Bringing last season’s roster over
Section titled “Bringing last season’s roster over”Migrating a club that ran last season somewhere else? Create the coming season, attach its tiers, and import those members as Inactive on those tiers with welcome emails off — nothing is sent. Then open the season and build a renewal batch from the roster: you review it, then release or schedule it, and each member gets one email to claim their account and pay. Members who have already paid for the coming season come in as Active instead — they need no invite.
Update fields mode edits existing members instead of creating new ones: rows match members by email, and blank cells leave the member’s current value unchanged — clearing a value isn’t possible through an import. Unlike a Replace in Add new members mode (see below), an update can move a member to a different Membership tier; Status is still never changed. It edits members only — Member of is ignored, so family members can’t be updated this way; edit them from the member’s profile instead.
Import family members in the same file
Section titled “Import family members in the same file”Family members go in the same file as the members they belong to, one person per row — there’s no separate family import. Fill the Member of column with the primary member’s email address and the row is imported as a family member of that person rather than as a member in their own right. The primary can be someone already on your roster or another row in the same file, in any order — a child listed above their parent works.
A family row only needs a name, in whichever name columns the file uses: a single Name column, or First name and Last name (filling one of the two is enough). Everyone in the file shares the same name columns — there’s no separate set for family members. Relationship (spouse, partner, child, parent, sibling, or other — anything else is kept as written), Birthday, Phone, an Email for contact, and any family custom fields are optional. Importing a family member does not create a login or send a joint-access invitation. A family row’s email does not have to be unique, and its Membership tier, Status, Member since, and waitlist cells are read, flagged as ignored, and left out.
The primary’s tier sets how many family members a household can hold. Rows past that limit are flagged in review; turn on Let households go over their family limit in the import settings to seat them anyway. A family row whose primary can’t be imported fails too, with an error naming the primary’s row number.
Re-importing a roster matches family members by name within their household and skips them unless you choose Replace, which updates that person instead of adding a second copy. The roster’s own CSV export writes Family Members as a count, not as rows, so it can’t be re-imported to rebuild households — bring family members in from your previous system’s export.
Review and fix rows before importing
Section titled “Review and fix rows before importing”Uploading opens a review table where every core cell is editable inline. Rows with problems — missing names, invalid emails, the same email on two rows of the file — are flagged, and the import button stays disabled until you fix or remove them. Above the table:
- Show rows with errors filters to just the flagged rows.
- Send welcome emails controls whether imported members get an email with a link to claim their account, worded for the status they land on. Inactive rows are never emailed. Turn it off to migrate an existing roster silently.
- A full-tier toggle (Waitlist members whose tier is full, or Leave members pending when their tier is full if your waitlist is disabled) diverts rows aimed at a full tier instead of failing them.
When a row matches someone already on your roster
Section titled “When a row matches someone already on your roster”In Add new members mode, a row whose email belongs to an existing member is flagged Already a member — skipped unless you choose Replace. It doesn’t block the import; you decide per row, or for all of them at once with Replace all / Skip all:
- Skip (the default) leaves the member exactly as they are.
- Replace writes the row’s name, phone, birthday, member since, and custom fields onto the existing member. A blank cell leaves the stored value alone. It never changes the member’s status or membership tier — a row carrying either is imported with that part ignored, so re-importing last season’s file can’t move anyone off their current membership.
Family rows work the same way inside their household: a family member matched by name is skipped unless you choose Replace, which updates that person rather than adding a copy.
Select rows to use Set tier, Set status, or Delete selected in bulk, then click Import N members (or Update N members).
Track the import
Section titled “Track the import”The import runs in the background and lands you on a progress page that updates live, with Succeeded, Failed, and — when a tier filled up — Tier was full counts. Rows that couldn’t be imported are listed in an Errors table with the row number, email, and reason; fix them in your file and re-upload. Memberley also emails you when the import finishes.
View past imports on the import page opens a drawer listing recent imports, each linking back to its results page.