
Check-in
Requires the Front Desk & Check-in module
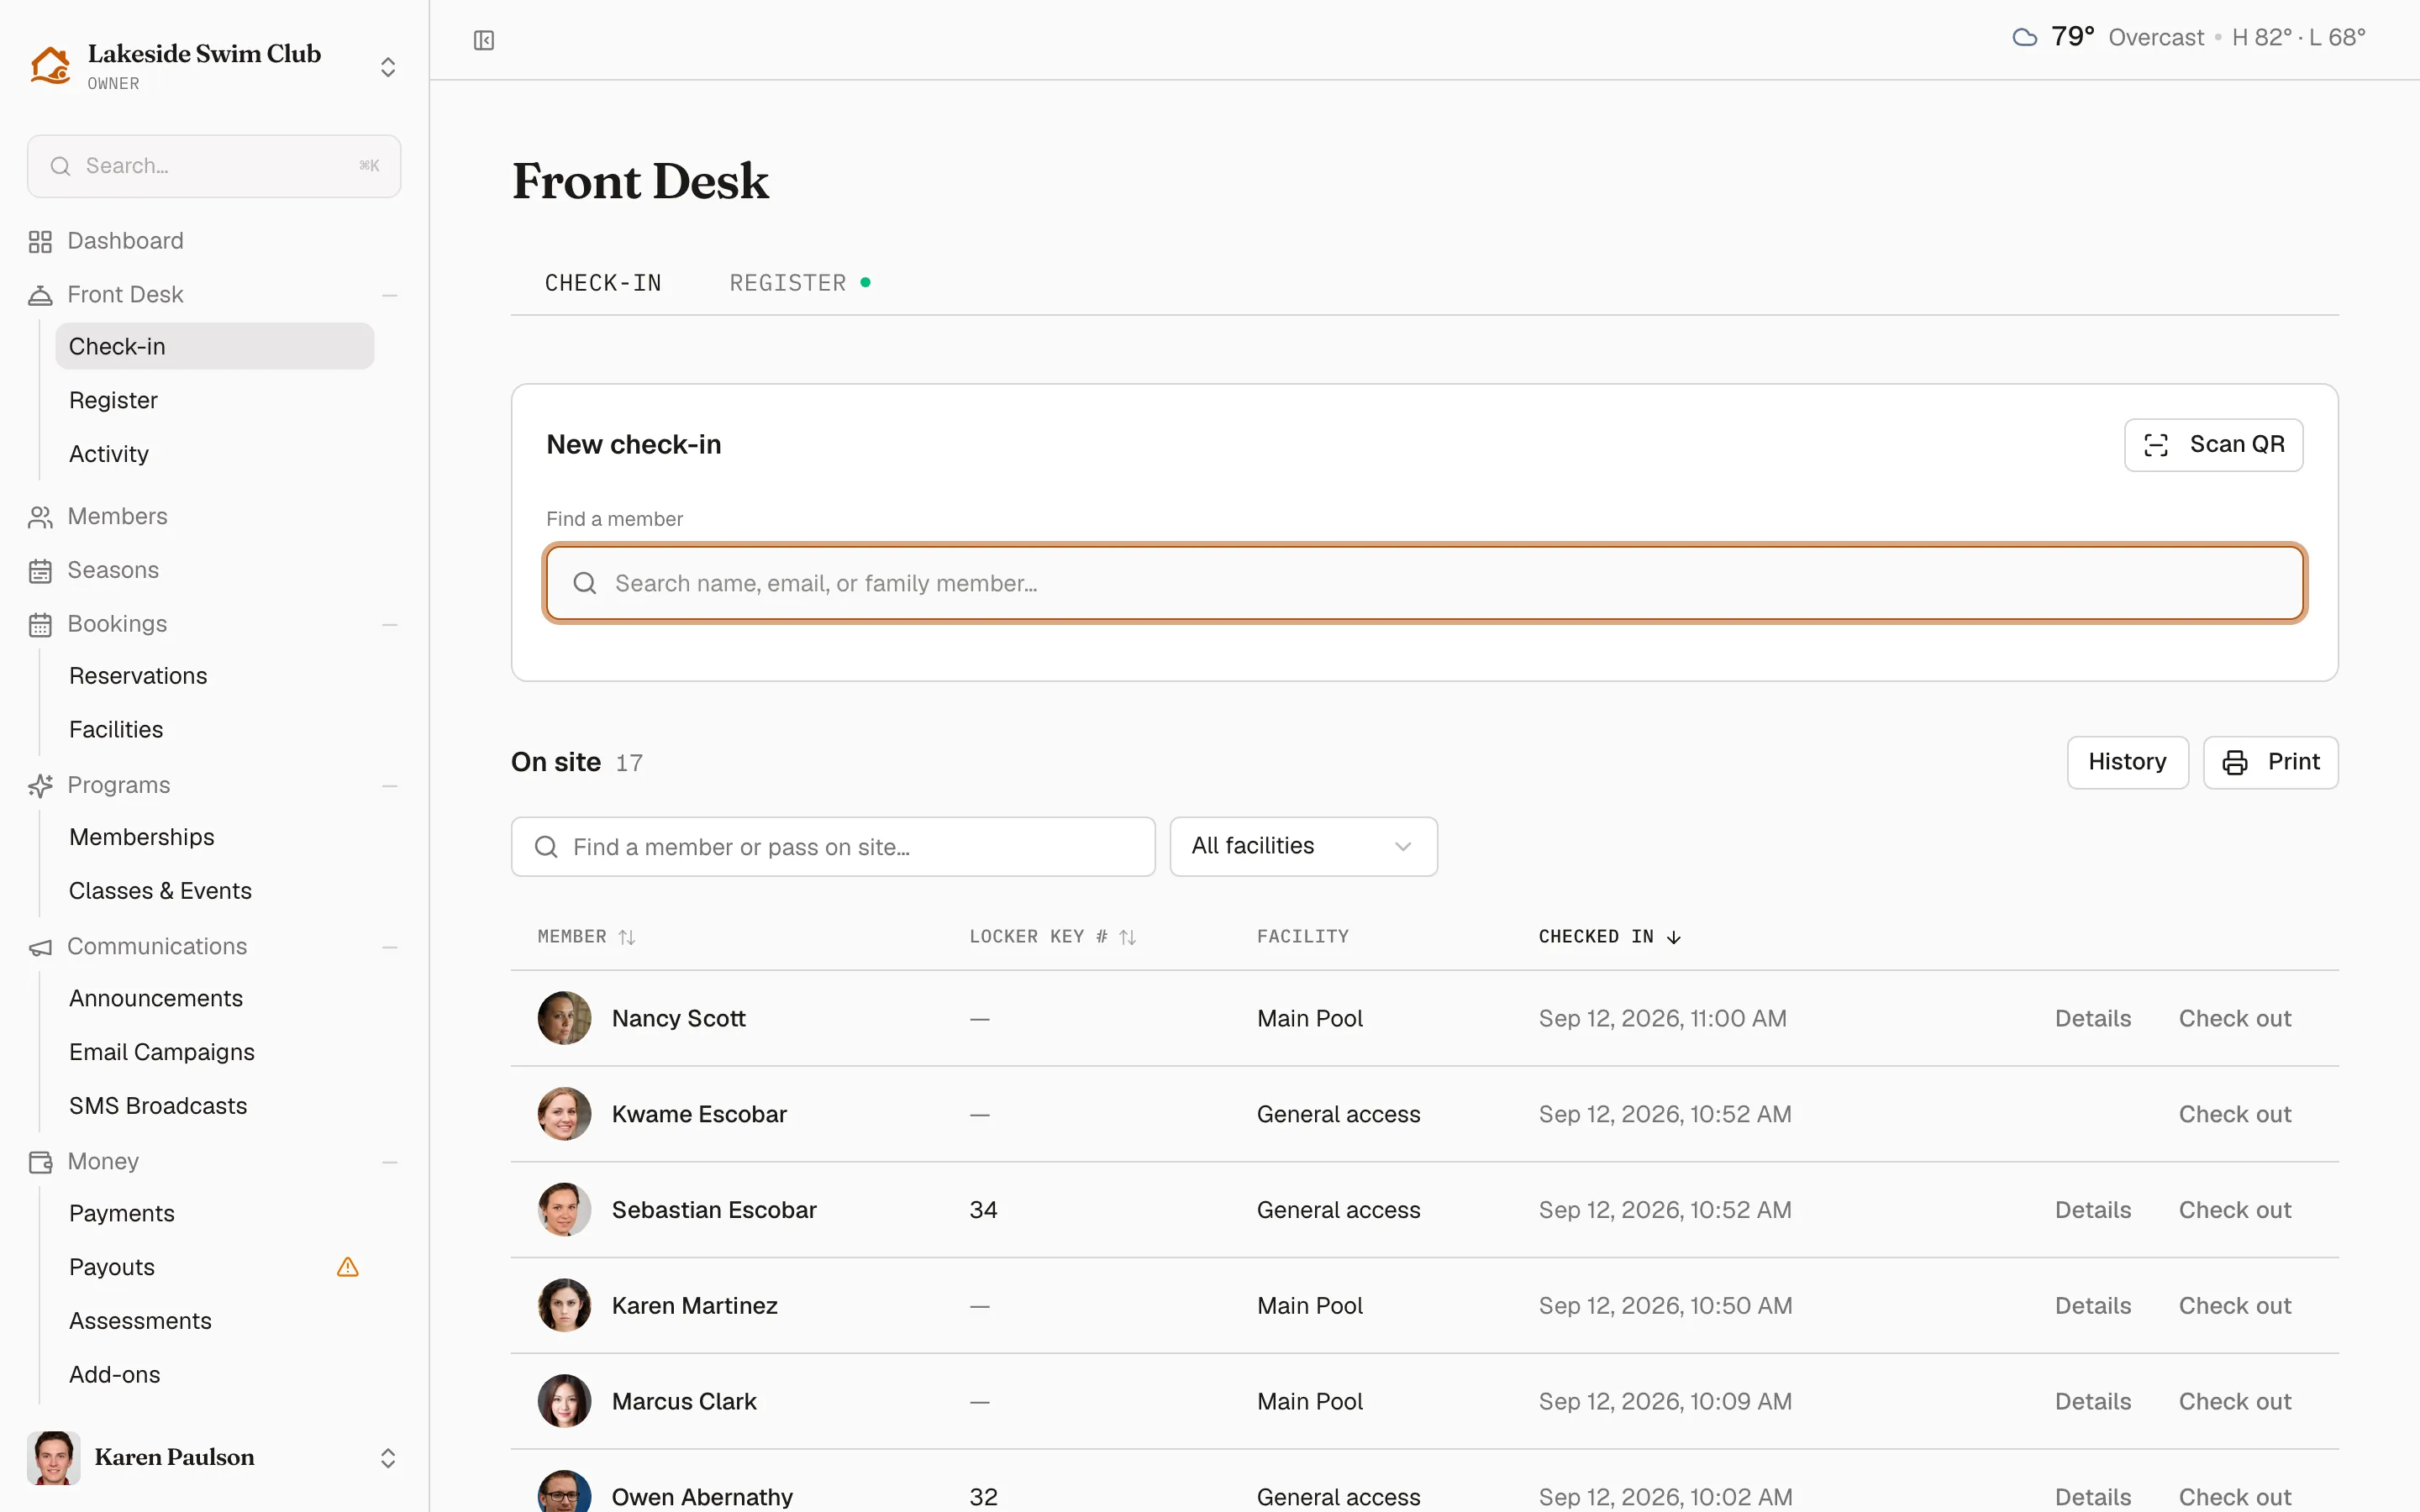
The Front Desk is where gate staff track who’s on site. Its Check-in tab is two things stacked: New check-in at the top, and On site below it — a live list of everyone currently checked in that refreshes every few seconds, so every device at the gate shows the same picture. Owners and managers can both work the desk.
Check in a member
Section titled “Check in a member”- Click Front Desk in the sidebar. The Check-in tab opens first.
- Start typing a name or email in Find a member — after two characters, Memberley searches members with an active membership and shows up to eight matches. Family members match too, and picking one brings up their household.
- The card fills in with everyone who might be here. Adjust it, then click Check in.
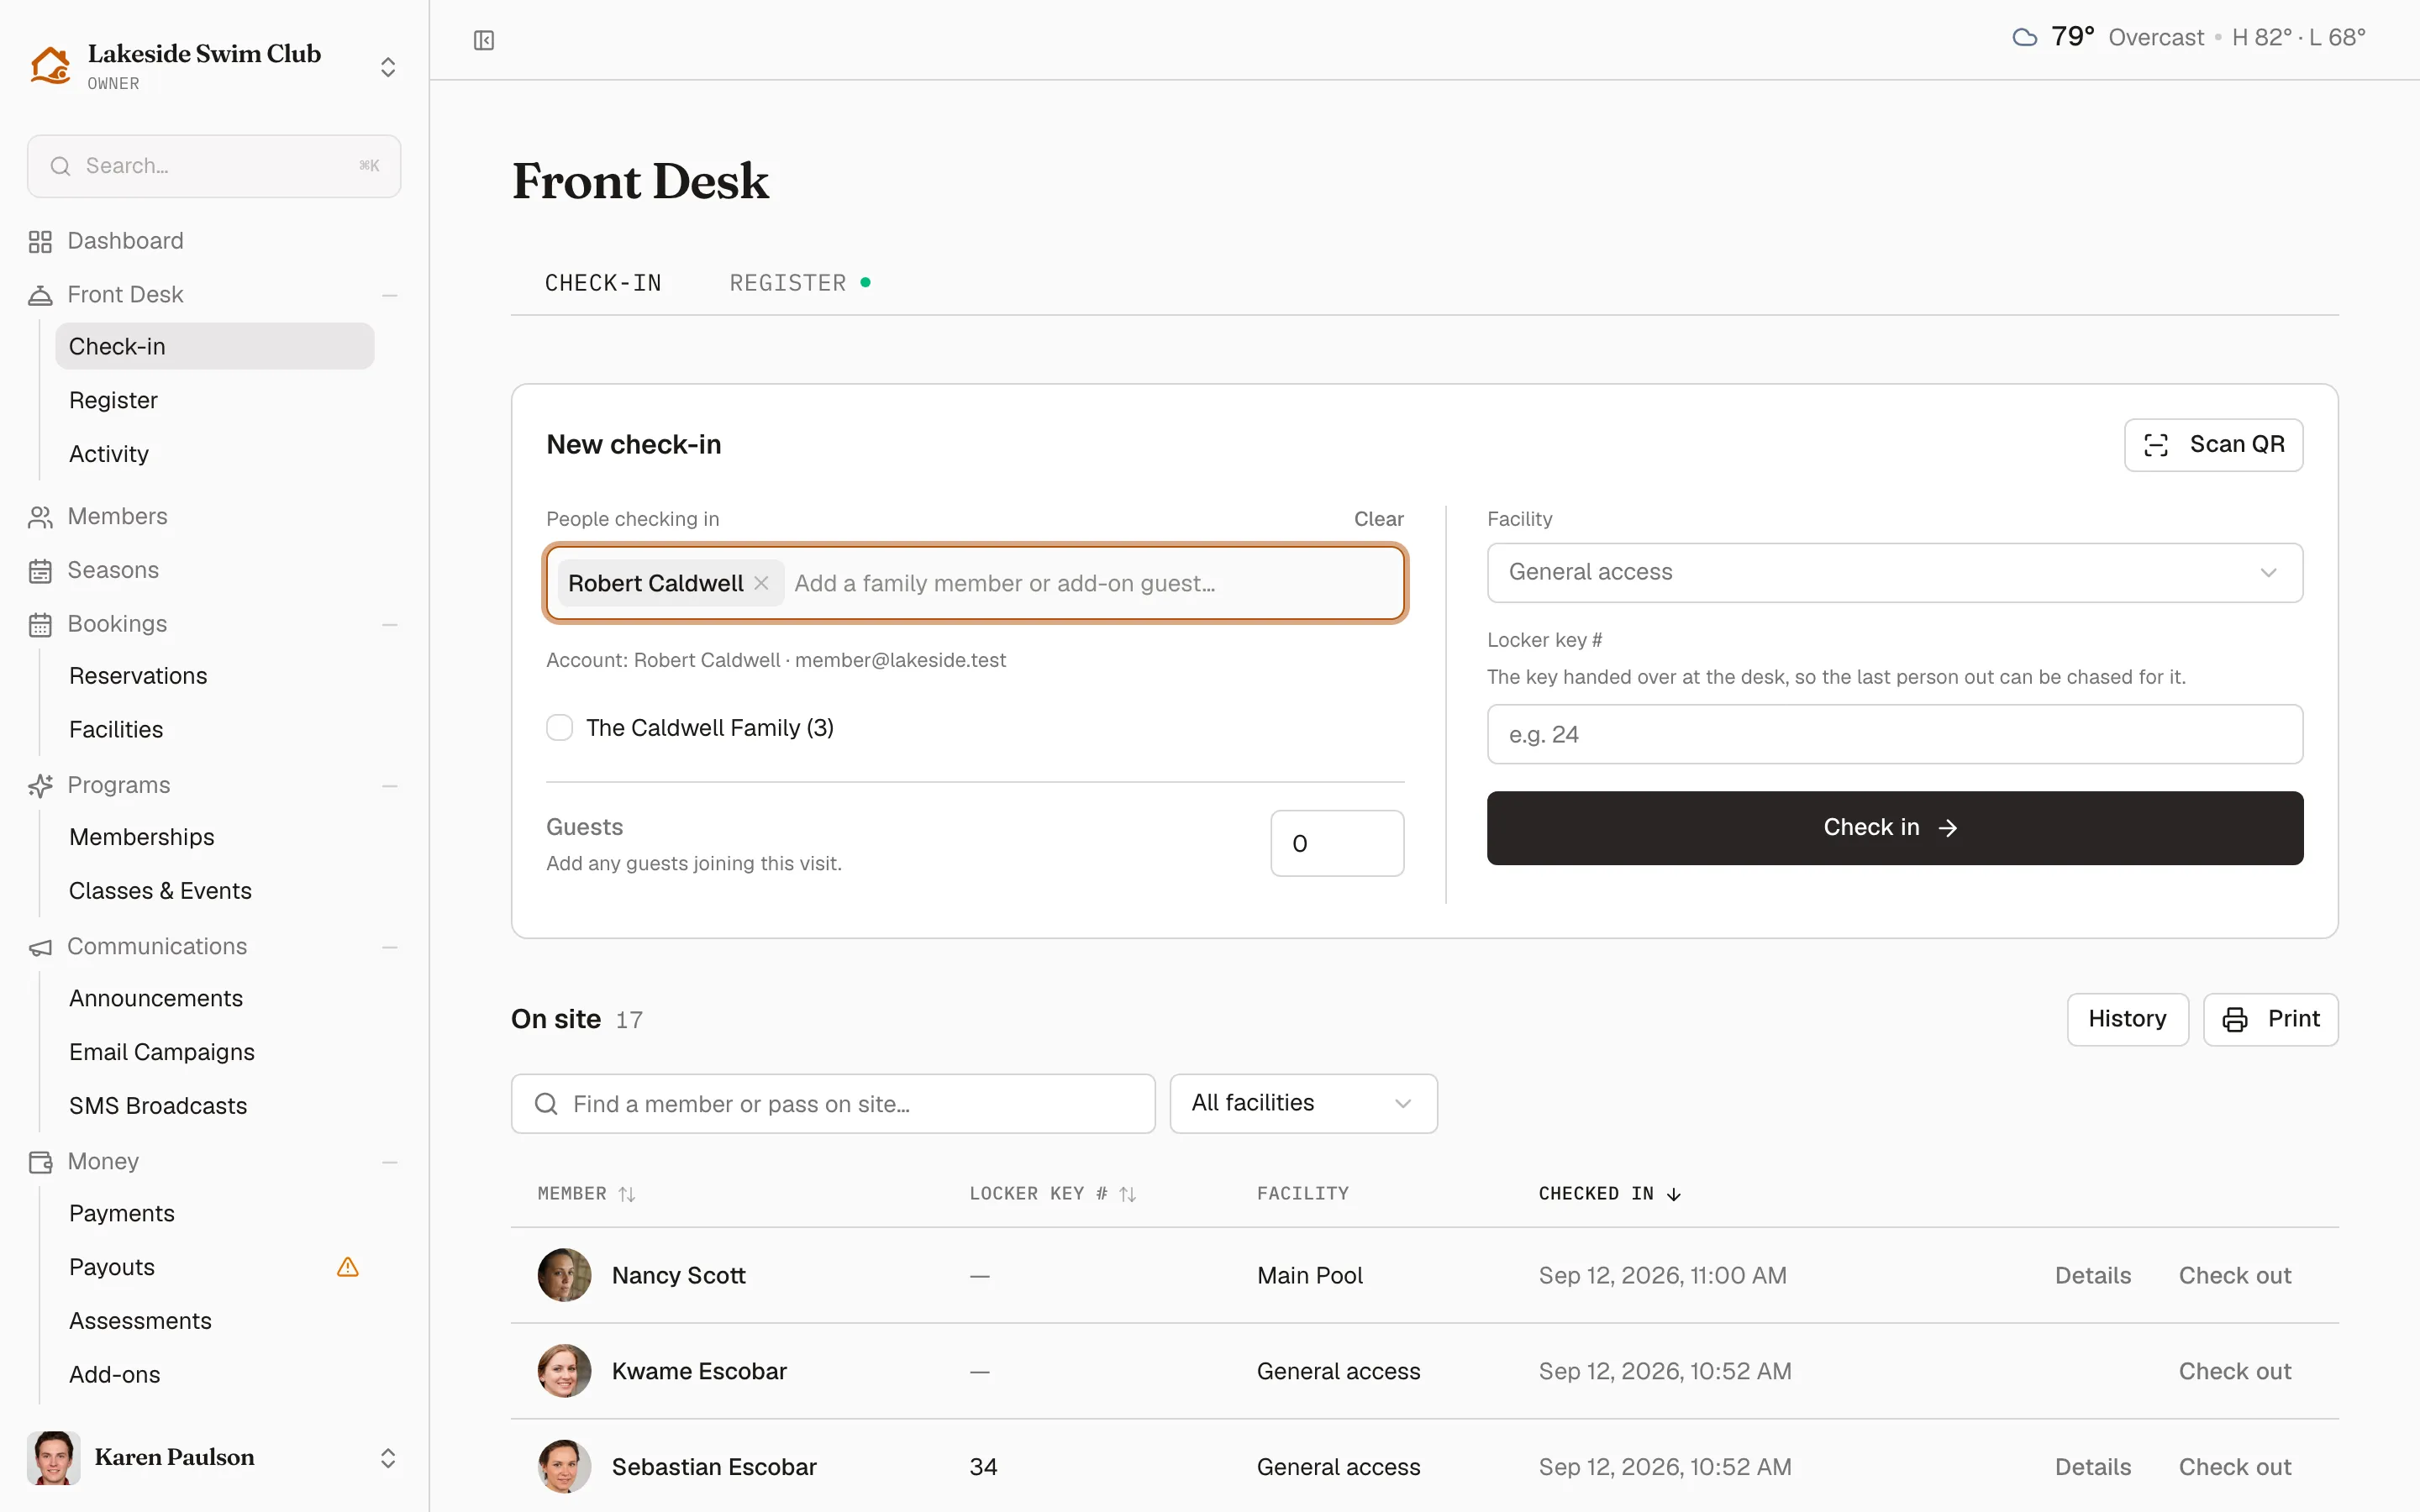
On a wide screen the card splits in two. The left half is who’s here:
- People checking in — a chip for each person. The member is added for you; type in the box to add a family member or someone covered by an add-on. Remove a household or add-on chip with its ×, or Clear to start over.
- An Account: line under the box, naming the household’s member and email — how you tell two Smiths apart before you commit.
- The … Family — one checkbox that takes the whole household at once, with its size beside it.
- Guests — the number of guests arriving with them. See below.
The right half is the visit itself:
- Facility — where they’re going. Left as General access, the visit isn’t tied to a facility, which is the right answer for a club with one gate.
- Any check-in fields your club asks for — a locker key, a beach pass number — filled in fresh for this visit. Set them up under Settings → Custom Fields in the sidebar, on the Check-ins tab, with the New check-in field button; see Custom fields.
- Check in, which saves the visit.
Submitting confirms inline — the member’s name followed by checked in. Ready for the next member. when one person came alone, Check-in complete. Ready for the next member. for anything larger — then the card clears itself and puts the cursor back in the search box for the next person in line.
Each person you list gets their own row on the on-site list, all under the primary member’s membership. Members receive a check-in confirmation, subject to their notification preferences.
Members without an active membership can’t be checked in — they won’t appear in the search, and the desk shows “This member does not have an active membership.” if one slips through. Guests always need someone from the household with them, unless your organization allows unaccompanied guests.
Bring guests — and guest passes
Section titled “Bring guests — and guest passes”The Guests box starts at 0, reading Add any guests joining this visit. Raise it — 20 is the ceiling — and a labeled slot appears for each one: Guest 1, Guest 2, and so on, each prompting Name (optional). The helper switches to Names are optional. Unnamed guests still count.
Returning guests — people this member has brought before — sit below the slots as chips: Choose a returning guest to fill an empty name above. Tap one and it takes the next empty slot; once every slot is filled the hint becomes Clear a name or increase the count to add another guest. New names you type join the member’s saved guest list for next time.
Every guest with a name also appears in People checking in as a muted chip pairing their name with (Guest), so that box reads as the whole party. Those mirror chips carry no × — to drop a guest, clear their name or lower the count in Guests.
Guests draw down the membership’s available guest passes first. If the member brings more guests than they have passes left, Memberley creates a charge for the extra passes at the tier’s per-pass price and confirms with “Check-in recorded. Guest pass charge created.” You can add passes to a membership from the member’s profile — click the + next to the guest pass counter to open Add Guest Passes, set a Quantity, and optionally tick Charge card on file?.
People covered by an add-on are the exception: add them as chips in People checking in and they consume no passes and cost nothing, because the pass was bought up front. They still count as guests for every other rule.
The on-site list
Section titled “The on-site list”On site shows who’s here right now, with a live count beside the heading and a column for each of your check-in fields. There’s no Status column — everyone on this list is on site by definition.
Narrow it with the search box (Find a member or pass on site…) or the facility filter (All facilities). With either set, a live “12 of 17 shown” counter appears next to a Clear filters button. With nobody here the table reads No members on site yet. Check in a member above.; filtered down to nothing, No matching check-ins.
- Details opens the visit: its check-in fields, editable, so a locker key handed over ten minutes later still lands on the right visit. Save changes applies it. It sits only on the primary member’s row, never on a family member’s. Answers to fields you’ve since archived or removed still show, under Previously collected fields · read only; a visit taken before you had any fields reads No fields have been collected for this check-in.
- Check out drops the person off the list. The visit stays in the member’s history and the activity feed.
- History opens the full check-in log.
- Print produces a roster to carry around — see below.
Checked someone in by mistake? Check them out — there’s no way to delete a check-in record once it’s made.
Print the on-site list
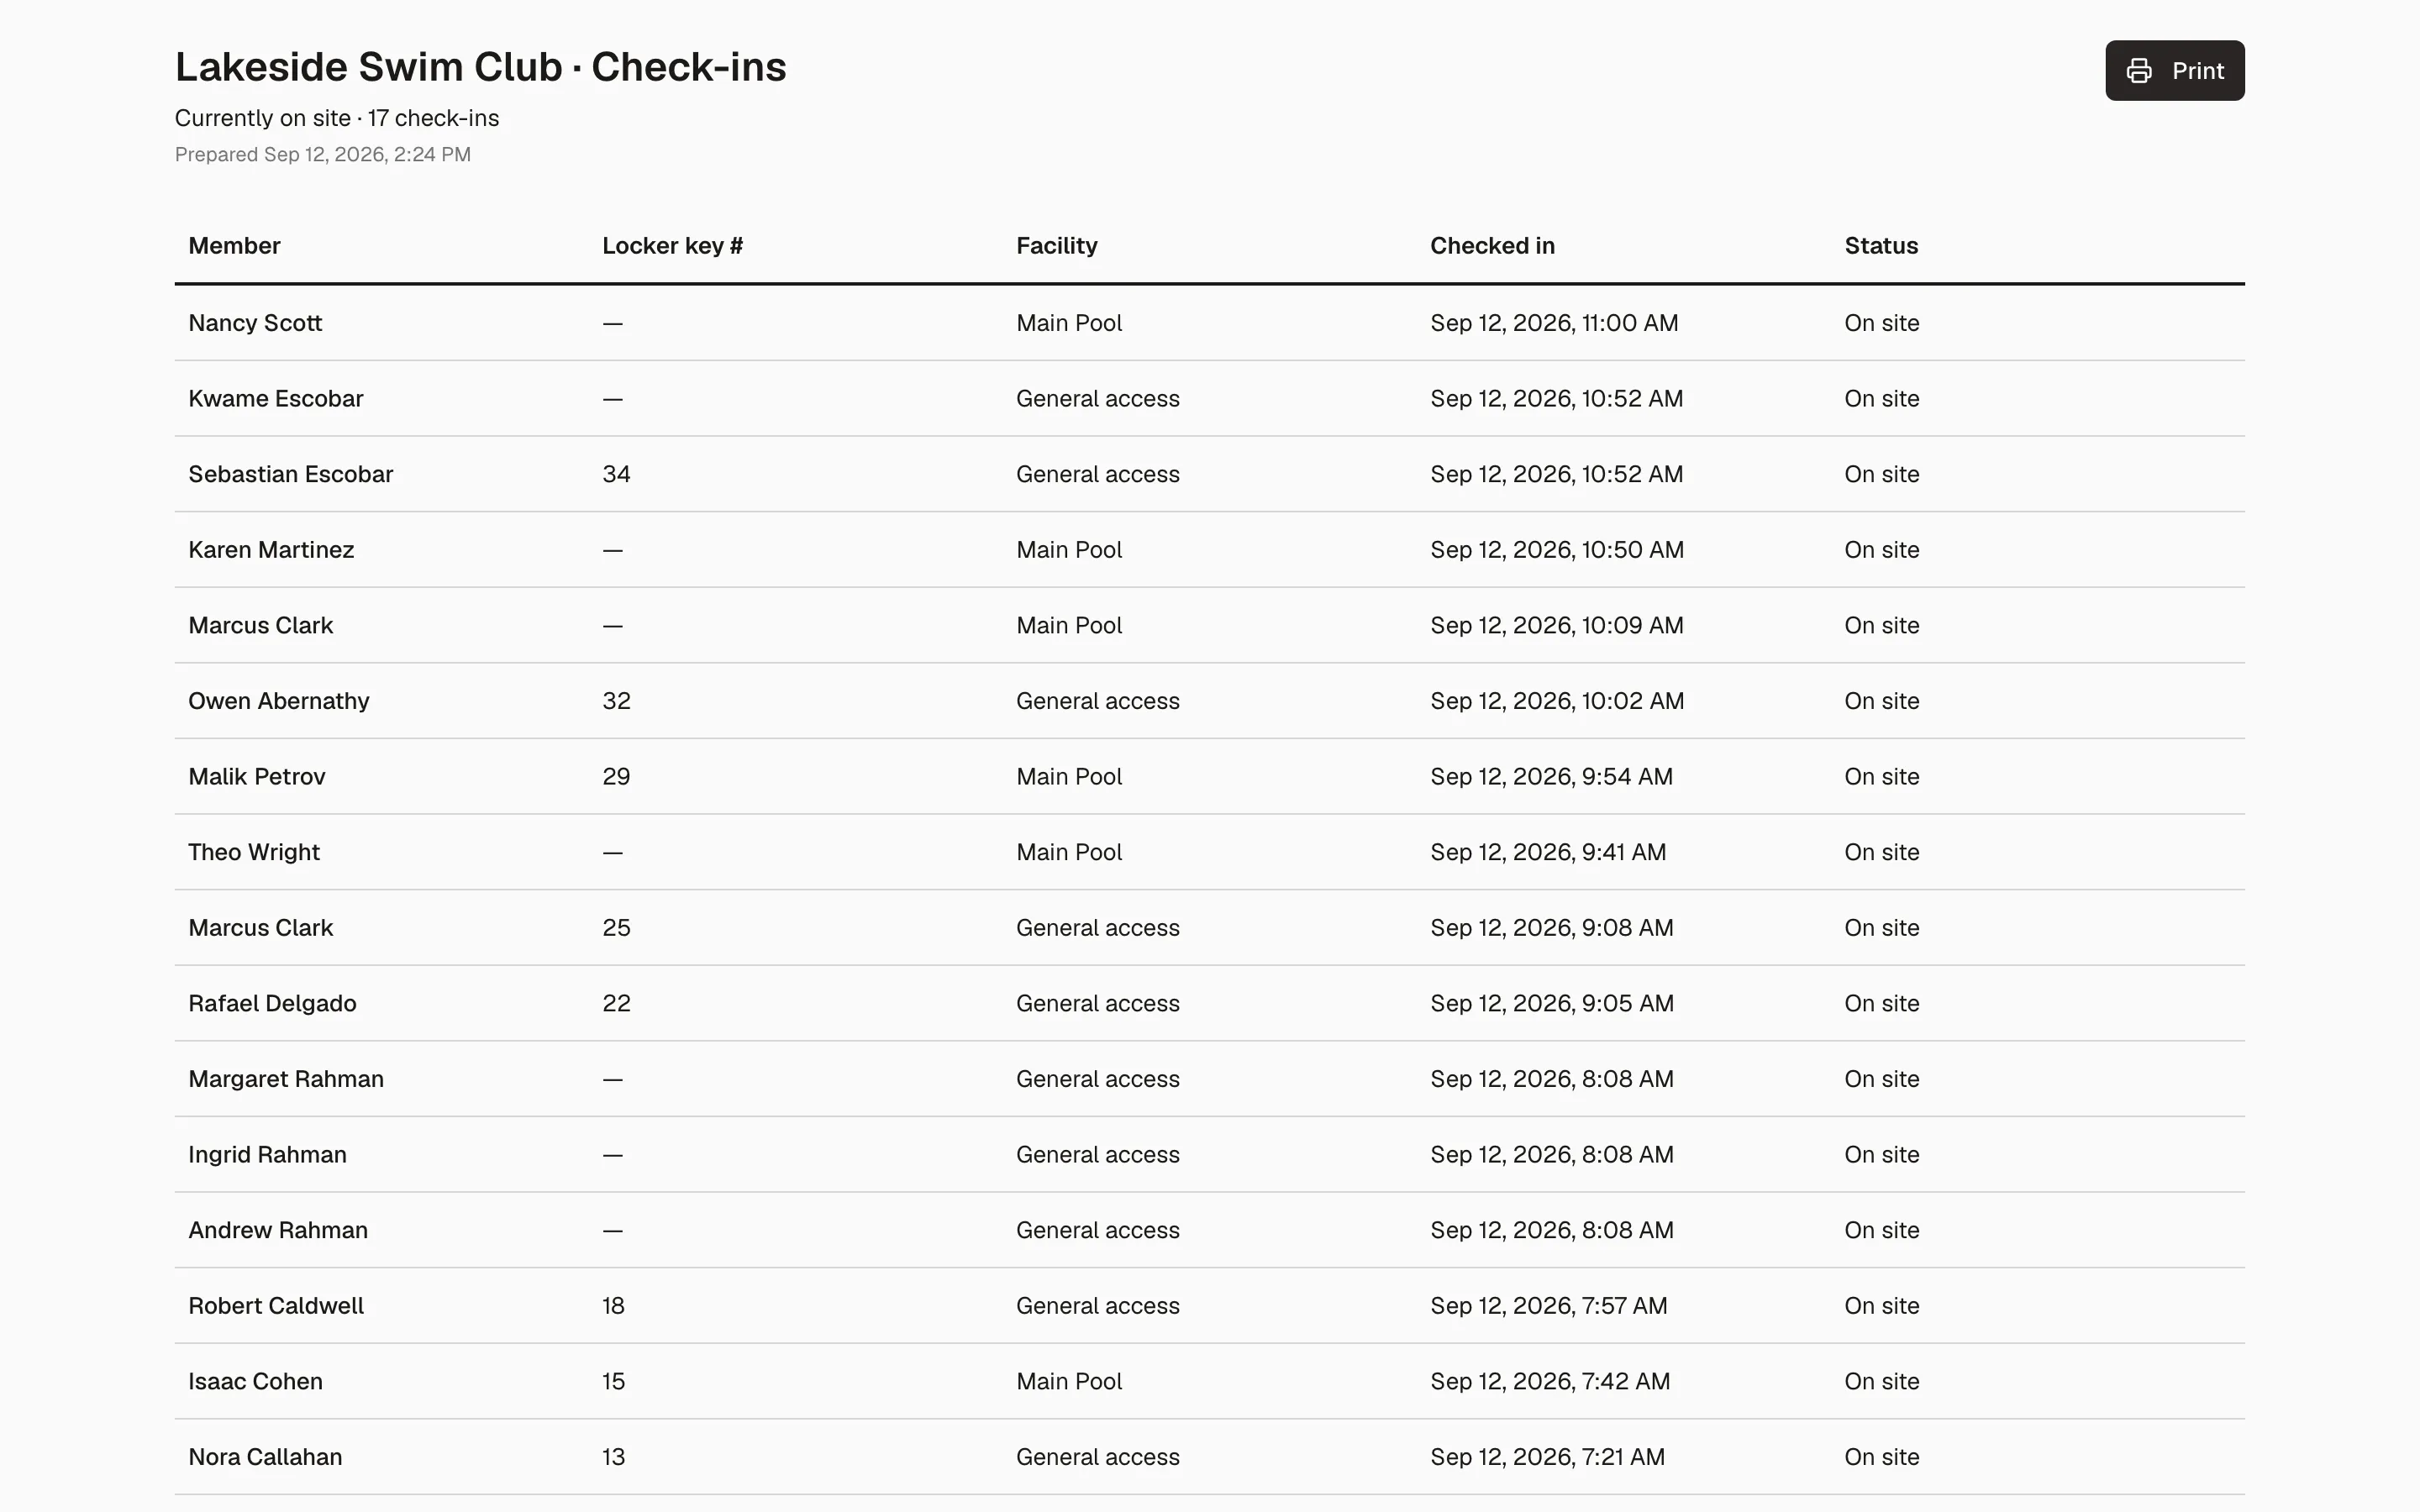
Section titled “Print the on-site list”Print opens a clean landscape roster of whatever the list is currently showing — member, your check-in fields, facility, check-in time, and status — with the club’s name and the time it was prepared at the top. Print it for a fire drill, a swim meet, or a walk of the grounds.
Look back through check-ins
Section titled “Look back through check-ins”History opens the Check-ins page: every visit, not just today’s.
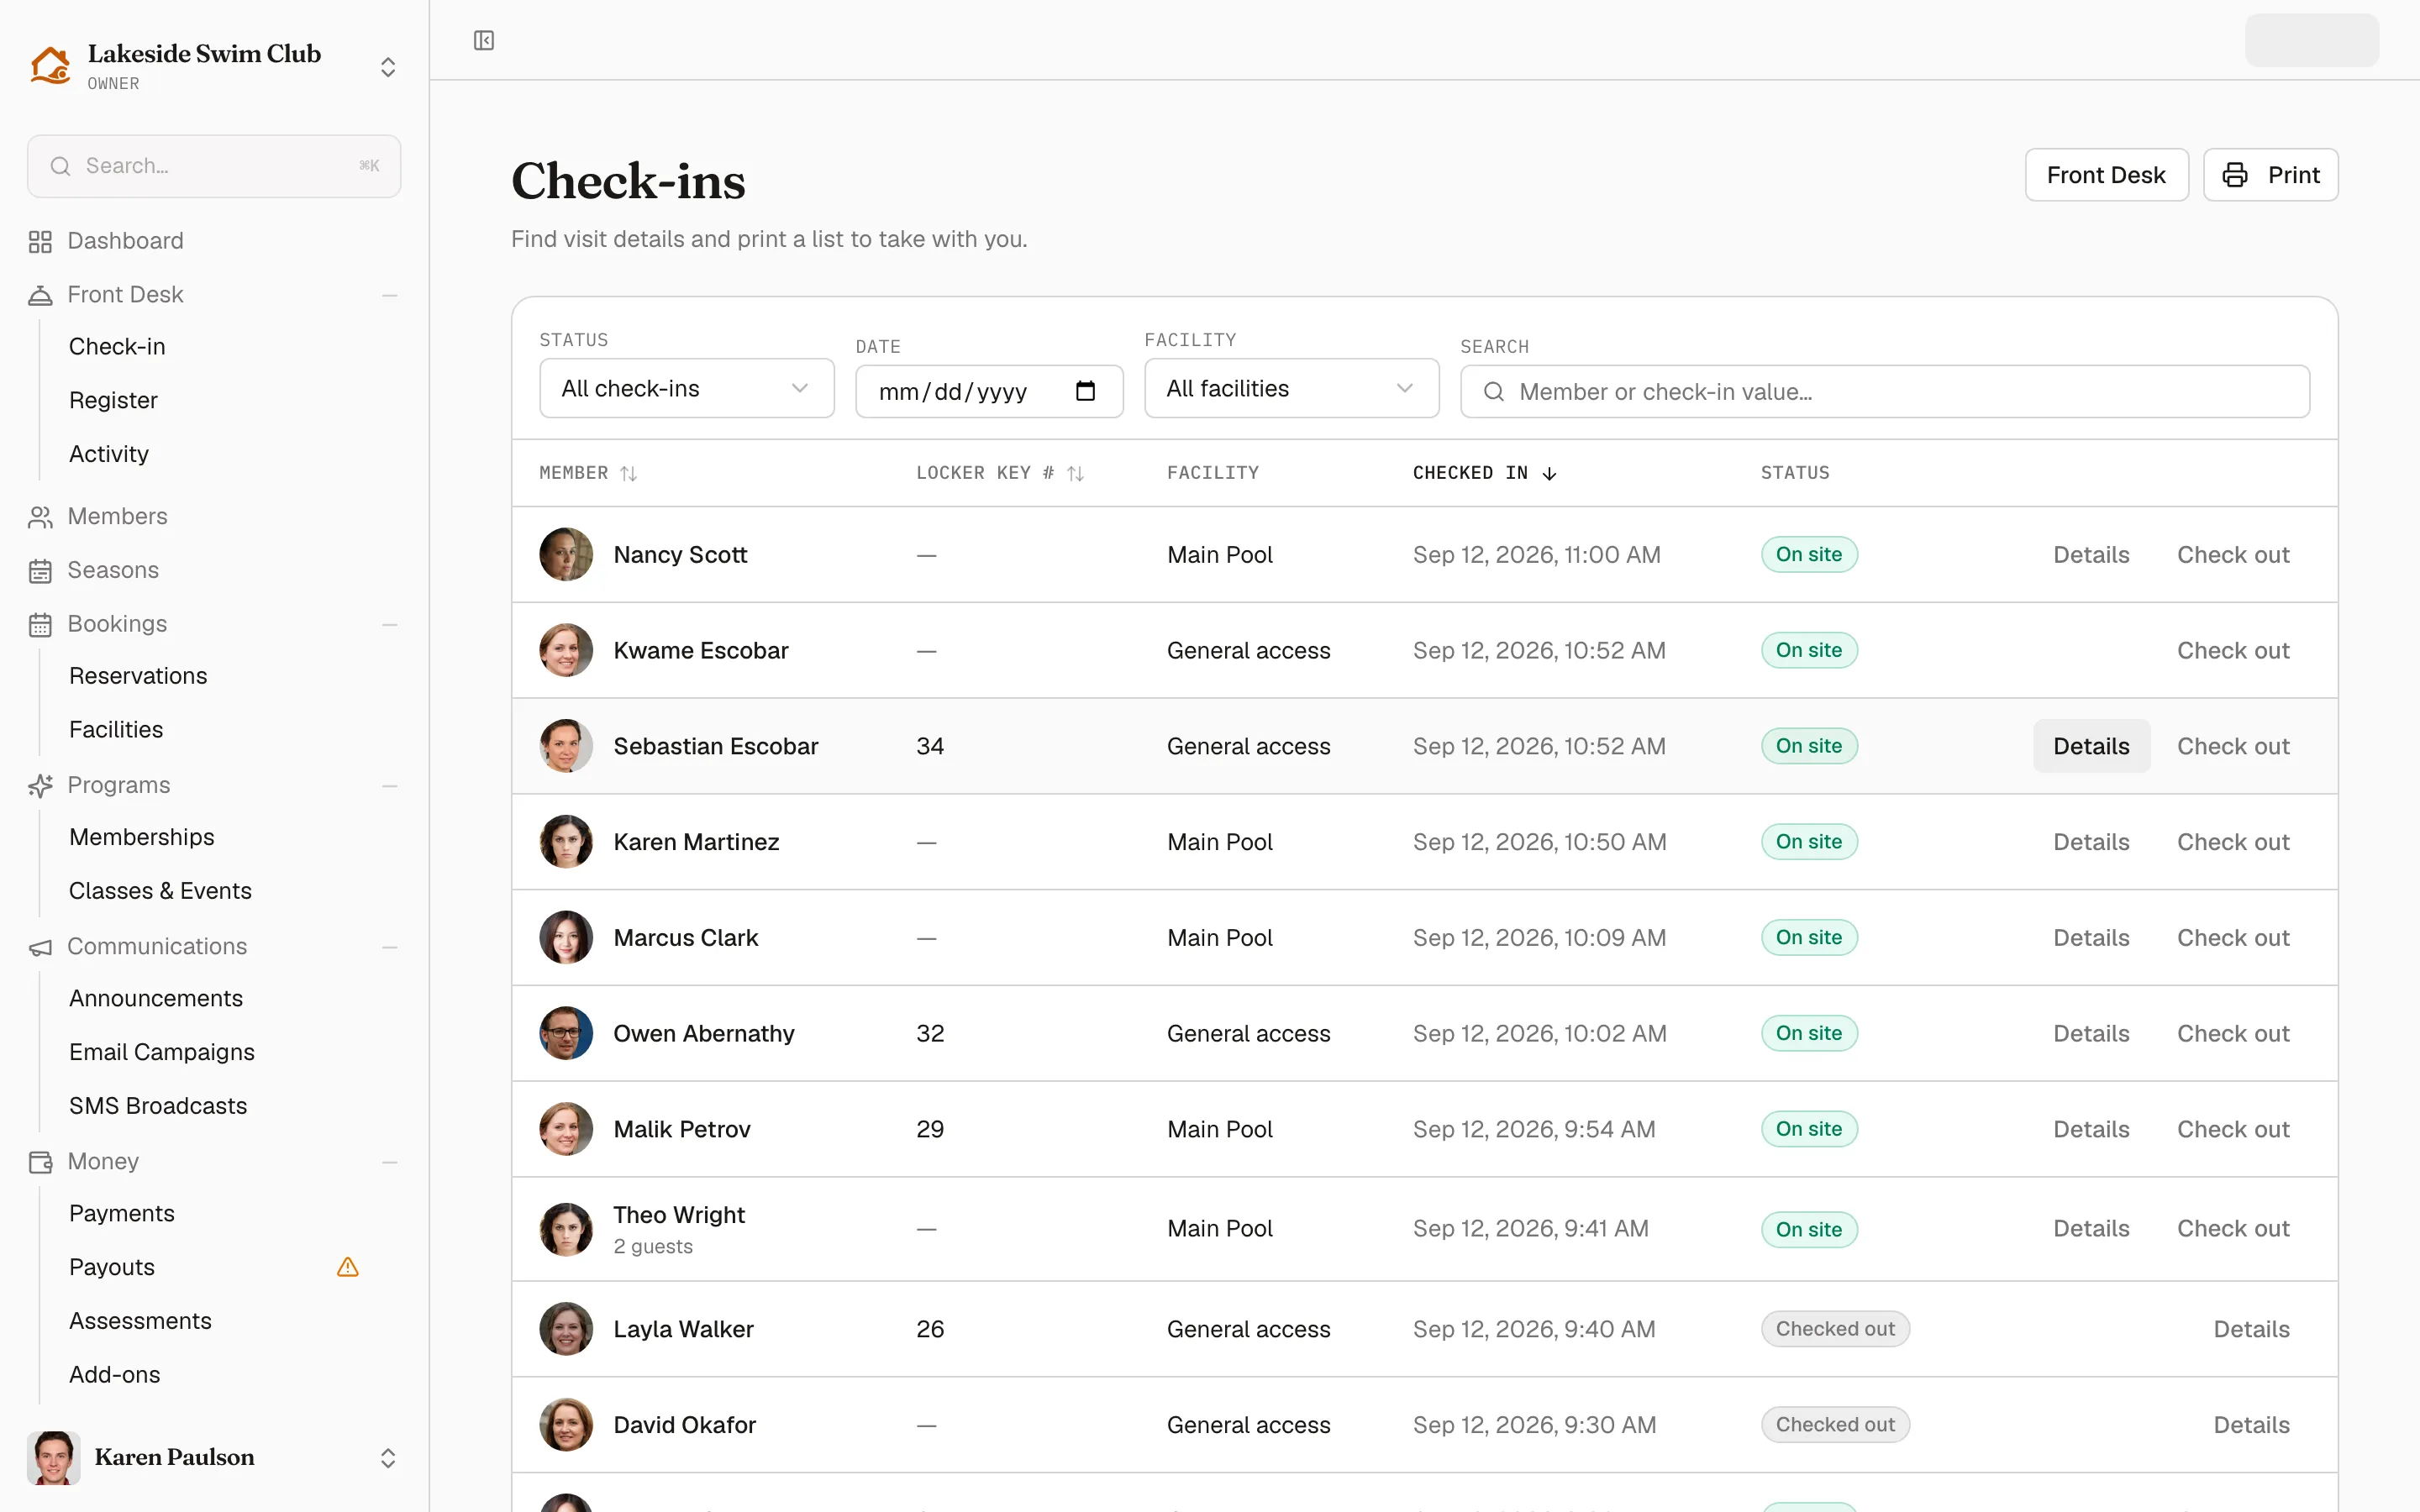
- Search matches a member’s name or any check-in field value — so “34” finds whoever had locker 34. The box prompts Member or check-in value…
- Status opens on Currently on site; switch it to All check-ins or Checked out.
- Date pins a single day; Facility narrows to one gate.
- Every sortable column header is a button carrying an arrow glyph — a double arrow while unsorted, a single one pointing the direction it’s sorted. Click to sort, click again to flip. Print takes whatever you’re looking at.
- Front Desk takes you back to the desk.
On a phone, Status, Date and Facility collapse behind a Filters button badged with the number of them you’ve set. Search stays on screen.
Handle delinquent members
Section titled “Handle delinquent members”What happens when a member with an overdue balance reaches the gate is controlled by the Delinquent members at check-in setting, in the Operations section of organization settings:
- Off — never gate on balance: check-ins go through with no balance check.
- Warn staff — allow, show a warning: the check-in succeeds, and staff see “Outstanding balance of $45.00 — payment is past due.”
- Block check-in until paid: the check-in is refused with “This member has an outstanding balance of $45.00. Collect payment to check in.”
Family members check in under the primary member’s membership, so it’s always the primary member’s balance that gates.
Checking a member in at a facility their tier doesn’t cover always goes through, with a warning naming the facility. Unlike balances and waivers there’s no setting to make it block — you’re standing there, and a tier misconfiguration shouldn’t turn a member away at the gate. Booking is where the restriction is enforced outright.
Member check-in codes (QR)
Section titled “Member check-in codes (QR)”Every member has a personal QR check-in code, scoped to your organization:
- Scan QR on the check-in card opens the scanner. A scanned code records the same check-in as the search flow, including guest passes and the delinquency and waiver gates above, and asks for any required check-in fields before it saves.
- Members find their code on the Check-in Code page in their sidebar, with Print and Rotate code buttons. Rotating instantly invalidates the old code — for a lost phone or a shared screenshot.
- Staff can view and print a member’s code from the member’s profile: click the QR badge on their photo to open the Check-In QR code dialog.
Treat the code like a member card — anyone who presents it can be checked in with it.